Sunday, January 30, 2011

1. Getting Started


This will be a blog about my experiences in building my dream home. It will concentrate on techniques I have discovered (or hope to discover) on how to get the maximum visual impact for the least amount of money.

Ever since I was very young, I've had a mental picture of my Dream Home. Set on a hill overlooking a green valley, the house would be a castle on a large lot, with a winding driveway leading up to it. There would be a quaint little town nearby, and a slightly larger city a bit farther away. What I settled for at the time was a cabin on a 1/4 acre lot in Lake Arrowhead, California. True, after 30 years of remodeling, it took on a castle-like appearance, but I always knew that this was not where I wanted to spend the rest of my life.

Thanks to a modest income from a computer screensaver I wrote and my wife's job as a nurse, we could afford to buy a lot and build a house. The question was -- where? It was obvious that our money would not go very far in Southern California.

So, my wife and I traveled around the country on vacations, always looking for the ideal spot. After several years, I began to get very discouraged. From the California Sierras to Colorado to North Carolina we saw some nice lots, but there was always some huge downside to every location. Too expensive, too run-down, too remote, too crowded, too steep, too flat, too prone to natural disasters. Whenever I talked to people, I'd always ask them where they would live, if job or family constraints did not exist. Very often, the Pacific Northwest would be mentioned. I had never really considered settling there, because my impression had always been one of endless cold, gloomy, depressing days.

Then I read an article in Newsweek magazine which recommended the Rogue Valley in Southern Oregon as one of the best places in the nation to retire. Protected by surrounding mountains, the area gets lots of sun, and only about half the rain of Portland or Seattle. So, we took a trip up here and were immediately sold on the area.  After a few months of property-hunting, we were able to find a 10-acre view lot for only about half as much as any other comparable lot we had looked at in California or Colorado. I finally had a lot which fit all my criteria -  a gentle uphill slope with a great site for a house, a full-time creek, sections of forest and meadow, and a magnificent view.


That was in 2002. The next few years were spent designing my Dream House. I had concentrated on Architecture in school, but went into the Air Force straight out of college, and never really used my architectural training except in working on my own projects. Now I was faced with designing the last house that I ever plan to build, so it must contain everything I've ever dreamed of. A theater, library, greenhouse, gameroom, castle tower, gym, gourmet kitchen, elevator. I had been hoping to keep the size of the house down to about 4,000 square feet, but the design quickly ballooned to 9,000. I kept paring down the size of the rooms, and ended up with about 7,000 square feet.

It was at this point that I realized a major truth about saving building costs. The size of the building footprint has a lot more effect on the final cost than the size of the house. In other words, it's a lot cheaper to build UP than OUT. Every house needs a foundation and a roof, no matter how many stories are in between. Since a foundation is needed anyway, digging it down another 10 feet for a full basement adds very little to the total cost, but doubles the number of square feet. Likewise, adding a second floor is a lot cheaper than adding a second wing. So, my final design has a full basement and two above-ground stories, with a footprint of 2500 square feet.

Saturday, January 29, 2011

2. The Design

One of the primary requirements for this house is that it needs to be nearly maintenance-free. I'm already 61 years old, and I don't see myself up on a ladder 20 years from now re-roofing, or touching up fancy detail woodwork. I've always been drawn to European architecture, but the level of detail can be very costly to build, and high-maintenance later on. So, I came up with what I call "Modern Bavarian" - a style which attempts to maintain the basic European shapes, while doing away with half-timbering or fancy filigree detail common in Alpine architecture. Materials would be stone, stucco, and a slate roof. With almost no wood, the exterior should be fireproof and extremely low-maintenance.

I had actually come up with this style about 30 years ago. I was going to use it for the additions to my house in California, including the interior furnishings. The best example was an aquarium I built of oak which contained all the styling elements I was going for: a steep roof, tall windows with octagon-shaped tops, and an indented base. I couldn't wait to apply this style to the new house.

So I set about drawing up the house plans, first with sketches, then on the computer. At first I used inexpensive architectural software by Better Homes and Gardens, but after a few months I switched to the semi-pro version by the same developers, Chief Architect. While great fun to use, home-design software can often be infuriating. You can spend hours creating a section, only to have it inexplicably disappear. My only advice is save, save, save. One of the neatest things about these home-design programs is the ability to see a 3D-view from any angle. Here are a couple of early renderings from different angles:


I spent about a year designing the house on the computer, then contracted with a licensed Oregon architect to bring my design up to Oregon code. I also needed an engineering firm to work out some of the structural challenges. My design was rather complex, and after two more years, the architect still had not been able to finalize the plans, especially the way the roofs would flow together. I decided that the only way to properly convey my ideas was to build a model. I had built several architectural models before, including a couple of very detailed ones with landscaping and interior lights.  This time, all I needed was a quick-and-dirty model of balsa wood to get the basic point across. Well, that took a month, but was MORE than worth it. After I presented the model to the architect and engineers, they quickly had the plans done and submitted to the County. Over the next couple of years, each major contractor would take the model home for a few days to familiarize himself with the design.  I can't count how many arguments were solved by simply referring to the model.


The basement would contain the gameroom, gym and theater. The main level would consist of the living room, library, dining room, kitchen, pantry, bathroom, laundry, storage room, and garage. The upper level would be comprised of three bedrooms and baths, and offices for my wife and myself. The highest point is a castle tower with a cupola on the top.

I built each floor of the model directly on a copy of the plans for that floor, so the scale is the same as the plans -  1/4-inch = 1 foot.  Each level pops off to expose the lower floors. I then mounted the whole thing in a base of styrofoam which I carved to approximate the contour around the house.

This is probably as good a time as any to mention the number-one cost-saving item in building a house: LABOR. If there's anything you can do yourself, do it yourself. I know that some of these tasks may seem intimidating at first, especially in this age of specialization, but most of them really aren't that hard.  After a couple of days at painting or plumbing or installing drywall, you'll seem like an expert to a casual observer, and your friends will be in awe of you.  The most important thing is Divide and Conquer. Can you plumb a house? No? It takes a couple of minutes to learn how to drill a hole in a stud, run some PEX tubing through it, and squeeze on a connector. Do that enough times and you've plumbed a house.

It would have cost several thousand dollars to have someone else build this model.  My cost? About $20 worth of materials. Balsa wood is easily cut with an Xacto knife, and Super Glue bonds the walls to the floor almost instantly. Yes, it took a month to build, but here's the most important thing I've learned about time in my old age: After about 30 days, that month would be gone whether or not I had a model to show for it. I could be watching TV at night, or I could be working on the model. Usually, I was doing both.  :)


Friday, January 28, 2011

3. Breaking Ground

With the plans approved, it was time to start building. Now, I had not exactly been idle while waiting for the approval process. I had hired a road grader to cut in a looped driveway through the property and compact a deep layer of gravel onto it. Eventually the driveway will be concrete, but in the meantime a couple of years' worth of construction vehicles rolling over it should compress the roadbed nicely. The driveway crosses a full-time creek, so I built a bridge over it. For this, I used an aluminum box-culvert kit from Contech Construction Products, which took me about a week to install, working alone.

All this was pre-recession, and I was still in pretty good shape financially. My Marine Aquarium program was the most popular screensaver in the world at that time, and it was providing a steady income. The point is that I was not as frugal as I could have been when we started construction (as my wife is always eager to remind me). I hired a General Contractor who was known for extremely high-quality homes. If I had it to do over again, I might have acted as my own General Contractor, but being new to the state I was unsure how things are done in Oregon, which sub-contractors to trust, etc. I'd heard some horror-stories, and was more comfortable with someone else riding herd on all the subs. (I ended up with a horror-story of my own, but more about that later.)
 
It was exciting to finally break ground. Giant earth-moving machines were digging out for the basement, and it was DEEP! The theater has 3 levels of stadium seating, and the lowest one is 5 feet deeper than the rest of the basement. Then we had to dig even deeper for foundations and drainage pipes.  The primary excavation contractor was an amazing fellow who had lost the use of his legs in a accident a few years before. Undaunted, he rigged hand controls in all his machines. He would park his truck beside an excavator, use his well-developed arms to make the long climb up into the cab, and for the rest of the day he would move mountains.


Also during this time I was having an electric line installed from the street to the building site.  This consisted of a large junction box at the street, a cable which was plowed 4 feet into the ground, a meter and huge transformer near the house. I'm glad I went underground, as there won't be any visible wires.

Here's the model on the freshly excavated house pad.
Wouldn't it be nice if I could just sprinkle some water on it and have it grow to full-size? :)


Thursday, January 27, 2011

4. Foundations


The story of the cement work on my house should serve as a cautionary tale about choosing your contractors carefully. My first concrete crew had just done a very large commercial building, and apparently lost a lot of money on it. They saw my project as a way of getting back into the black. This was just the first example of what has become a recurring theme -  contractors assuming that someone who is attempting to build a house like this has unlimited resources. Anyway, a large crew started work, and it was only when I got the bill a month later that I found I was being charged $60 per hour for each of those guys. Now I have nothing against workers earning a decent living, but why would anyone ever become a policeman or fireman or teacher if they can earn $60 per hour carrying rebar? Our resources were being drained at an unsustainable rate.

But that's not the worst of it. The crew spent a couple of weeks building the complex forms for the foundations around the front part of the house, and it was almost time to start pouring concrete.  Luckily, my General Contractor had a soil engineer test the ground under the footings. Well, his 3-foot probe practically fell into the ground.  "You can't pour foundations on this stuff, it's all just fill and tree roots.  Your cement contractor should have known about this!"

So, all those foundation forms had to be dismantled, and the ground had to be dug down another 8 feet, to solid bedrock. The forms were then rebuilt. I suppose it could have been worse -  at least it was caught before any cement was poured. The concrete work for the rest of the basement went smoothly, but when I found that the cement contractor was unwilling to refund anything for the mistake, I fired him.  I later found out that many people in the area had similar stories about the guy.  He has since left the state.

Contractors like to work on a time-and-materials basis, but that essentially means a blank check from the homeowner. I learned my lesson -  get at least a ballpark figure for each job, and ask for references.  The second cement crew had good references and much lower prices.

The way I'd always seen foundations done before is to dig trenches, build the edges up with wood, add rebar and pour the trenches full of concrete. Not so, here - there were no trenches. Instead, large areas were scraped flat, then topped with a foot of compacted gravel. The forms for the footings were then built on top of this pad and rebar was added.

After the foundations were poured, the forms were removed and the areas in between the footings were filled with gravel, which was compacted before pouring concrete floors on top of it.
Here's the wall that was necessary to bring the foundations from the footings back up to ground level after the front of the house had to be re-excavated. Remember, the top of this wall just gets us up to the level of the basement floor. These walls are about 8 feet high, and 18" thick. It's almost like building a whole house which will be buried and never seen again. With the new cement crew, we were back to forward progress, but our finances had been severely depleted by the first crew. It was no longer assured that we'd have enough money to finish the house.

Wednesday, January 26, 2011

5. Basement Floors

Our old house in California had a lot of problems with water-seepage during rainstorms, so waterproofing is a big priority with the new house. The exterior foundation walls were coated with a black rubberized plastic material, then a layer of pink styrofoam was added to protect this membrane. It still seems like the waterproofing contractor went a bit overboard by doing this on walls which were all going to be below the basement floor, but he would not guarantee the job unless it was done.

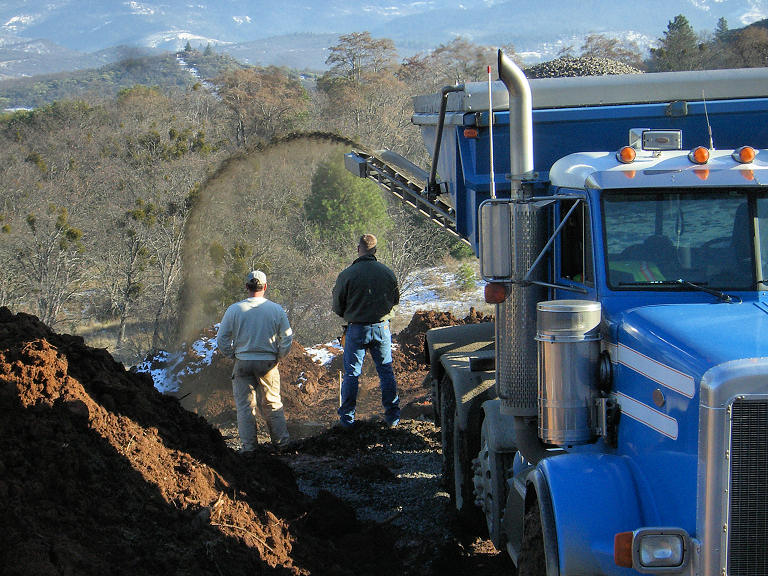
The empty space inside this perimeter was then filled with gravel, which was compacted every 6 inches of depth.  The gravel was "shot" into place by a special type of gravel truck.  This truck has a large hopper which feeds gravel onto a fast-moving conveyer belt. By positioning the truck on a hill above the work area, the gravel stream can be aimed very precisely and shot about 60 feet. The cost of this service is only a little more than the price of the gravel alone, and it's far more efficient than dumping it in a pile and moving it with skip loaders.

The floors in the basement and main level will be stained concrete. This can be a huge money-saver, as no floor covering (tile, wood, carpet) is needed. The downside is that cement floors can get pretty cold. So, we embedded heating tubes in the floors. When the full system is in place, water (with a bit of anti-freeze) will flow through these tubes and connect to a geothermal grid in the ground outside. A heat-pump will keep the floors warm in the winter and cool in the summer. This scheme has become quite popular around here, and homeowners report that very little additional heating or cooling is required.

With the heating tubes and rebar installed, it was time to pour the basement floors. The floors needed to be poured up against the basement walls, so the first couple of rows of Insulated Concrete Forms had to be put in. I'll talk about the ICF walls in the next chapter, but I thought I'd just mention them now because the blocks are visible in these pictures.

Pouring the floors was a very large job, so it was done in several sections over a few weeks. Expansion joints are scribed in, forming 3-foot squares. The concrete will be stained to simulate the look of large Italian floor tiles. The day after pouring each section, the cement was covered with plastic so that it would cure slowly. A couple of weeks later, the whole basement floor was covered with plywood to protect it from wear-and-tear during construction. The concrete would not be seen again for a year.

Tuesday, January 25, 2011

6. Basement Walls


We decided to use Insulated Concrete Forms for the exterior basement walls.  This is a fairly new technique for building concrete walls, but is catching on rapidly.  They are large blocks consisting of two 2"-thick Styrofoam sheets separated by plastic ribs. They are stacked up like cinderblocks, then poured full of concrete.

There are several wall thicknesses available, determined by the length of the ribs. For the theater area, we used blocks with a 12" concrete core for a total wall thickness of 16". Walls in less critical areas were thinner.
 

Blocks were stacked, and lots of rebar was inserted, both horizontally and vertically. Wooden bucks were made for places where openings were needed. These will remain in place, and the window and door frames will screw into them later. Metal braces and plywood hold the walls straight and vertical during pouring, which can get pretty violent.

We used Eco brand blocks, because our contractor was familiar with them, but if I had it to do over again, I might have chosen a different brand. Eco Blocks work fine on straight sections and 90-degree corners, but nearly all my corners were 45-degrees. The corners all had to be hand-cut, then held in place with plastic sleeves. These were a weak point during cement-pouring, and some of them buckled slightly. Other brands of ICF have pre-cast 45-degree corners which should eliminate this problem.

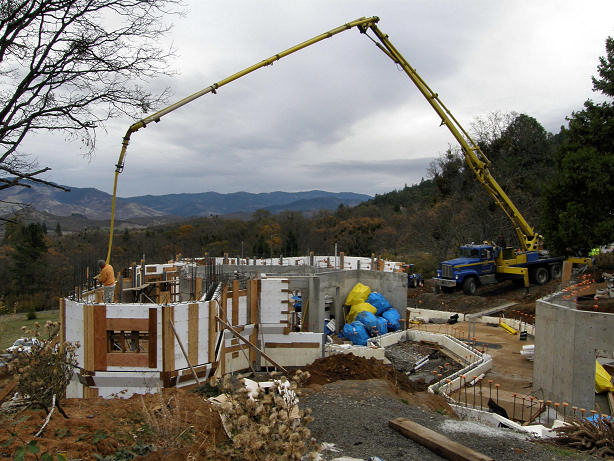
The concrete for the walls was pumped in using a crane pump. This is a little more costly than using a regular hose pump, but not much. It's practically vital for pouring the fragile ICF blocks, and allows the cement to be placed with great precision. Concrete vibrators are inserted into the wet cement to ensure that it flows into all the nooks and crannies.
ICF blocks simplify construction in several ways.  They can be put in fairly quickly by a very small crew (often just one guy!). They have a high R-Value, and no further insulation is generally needed. The exterior is smooth and can be waterproofed fairly easily with a peel&stick membrane. The interior is ready to take drywall -  just screw it into the plastic ribs, which are spaced every 8 inches and hold screws extremely well.  It's easy to cut holes and grooves in the Styrofoam for switchboxes and wiring.
While the ICF walls were going up, work was also being done on the interior walls of the basement. These are all just 8"-thick concrete, but the wooden forms were fairly complex and slow to build. There were also electrical conduits which had to be embedded in them.
These walls were also poured with the sky crane pump.


At the same time, the remainder of the floors were being poured. With the different levels for stadium seating, the theater floor was a bit of a challenge, and took a lot of concrete. There were times when five cement trucks would be lined up on the driveway, waiting to deliver their loads.


Like nearly everything in this house, the ICF work stretched the knowledge and abilities of the contractor to the limit. In addition to the 45-degree corners, there were other highly unusual features like this round metal buck for a future underwater window in the gameroom.

Finally, all the basement walls were up, and we could start on the main floor.

Monday, January 24, 2011

7. Insul-Deck


For the structure of the main floor, we decided to go with Insul-Deck lightweight concrete forms. Like the ICF blocks we used for the basement walls, these are pre-cast Styrofoam forms for pouring concrete and also provide ceiling insulation for the life of the building. In our case, the architect and engineer carefully measured each piece which would be required so that the lengths could be pre-cut (to rough measurements) at the factory. They did a pretty good job at these estimates -  even with all the angles there was very little waste.

There are several brands of these overhead lightweight concrete forms. Insul-Deck was one of the first, and was readily available through my local material supplier, so we went with that brand. Since that time, other types have come on the market which might have a slight advantage for some building situations. Embedded within the Styrofoam are metal "ribs" which keep the form stiff during construction. These also act as ceiling joists later on, providing a firm anchor for attaching drywall, ceiling lights, etc. My engineer went with a different brand on later projects, primarily because they had heftier "ribs", and did not need as much shoring to support the wet concrete. Other than that, the Insul-Deck forms have worked out extremely well for me.

Construction is fairly straightforward: Install a plywood "dam" around the perimeter, build temporary 2x4 walls to support the forms from underneath, and start laying the forms across them. The bottom edges of the forms touch each other and form a nearly-waterproof seal (it's surprising how little leakage comes through when you pour the cement on top). The forms are plenty sturdy enough to walk on while placing the steel and pouring cement. They have two large hollow tubes and four small ones running throughout their length. These spaces can be used to run water tubing, sewage pipes, and electrical lines. You can also chisel out as much of the Styrofoam as necessary from the bottom side to insert flush-mount ceiling cans for light fixtures. The amount of steel used was engineered for the clear span over the room below, but I still had the cement contractor put a 1" crown in the center of the garage floor.  I'm glad I did, because two years later the floor is virtually level.
We started by pouring the garage floor.  It was the easiest section, because there were no heating tubes or expansion joints. We used a regular hose-pump for the floors, not the crane. It took about an hour to fill the section with concrete, then the rest of the day to finish it off. No power floats were used, all the leveling and smoothing was done by hand.

If I had this part to do again, I might have put expansion joints in the garage floor. Now (over two years later), a lot of hairline cracks have appeared in the floor. They won't show, because this part will be covered by an epoxy coating. 


It took several weeks to pour all the sections of the main floor. Most of this level has heated floors, so there were a lot of heating tubes to install.  Care must be taken to keep them away from future walls, because it's easy to drill into the tubes when putting in wall anchors.  When all the tubes are in place, the system is pressurized to 100 PSI. After all the walls are in place, you know you haven't punctured anything if it's still holding pressure. 

With the final section of floor poured, we just had to keep it wet for a few days so that it would cure slowly.


Sunday, January 23, 2011

8. The Tower of Terror


There will be a spiral staircase leading from the basement to my office above the garage. This will be housed in a concrete-block tower, which will be topped by a cupola. Work on this tower was started soon after the garage floor was poured, while the other floor sections were still under construction.

There was already a hole in the garage floor leading down to the basement, and this tower would just extend that up another 20 feet or so. Blocks were laid in "lifts" consisting of 8 courses each. Each lift took a day, then rebar was added, and the lift was filled with concrete, usually the next morning. Then the next lift was started immediately.

The masonry crew worked quickly, and the blockwork was fairly inexpensive. Of course, unlike Insulated Concrete Forms, the exterior block walls will need a layer of insulation later, and that will add to the expense down the road.

The tower quickly grew to impressive proportions.  The doorways and small turret-style windows were framed in with wooden bucks, which will remain permanently.


By the time it reached its full height, the scaffolds made the whole thing look more like a missile-launch gantry than a stair well. 

When the block crew was finished, it was my job to add a platform on top of the structure. This would cap off the tower for now and form the floor of the cupola later. The workers had neglected to add anchor bolts to the top course of blocks, so I had to climb up there, drill holes, and epoxy the anchor bolts into the blocks. This is when I started referring to it as the Tower of Terror. I don't really have a height phobia, but the top of that tower was a LONG way up, especially when looking down the center of it at the basement floor far below. The scaffolds had all been removed by that time, so it was just me and an 8-inch wide block-edge to balance on.

It seemed like nearly every hole just happened to be over a hidden piece of rebar, and when the drill would catch these it would try to hurl me violently off the tower.


Things got a lot easier when I started to put the actual floor on, and had a bigger place to stand. In addition to the spiral staircase, my daughter has convinced me to install a climbing wall inside the tower.  There will be an automatic-belay harness system attached to the ceiling.


Click on "Older Posts" below for newer posts.
(Yes, I know. It's a Blogspot thing)